A Geometric Cost Driver (GCD) is a geometric feature of a component. A GCD may be a physical concept, such as the thickness of sheet metal or the finished mass of a cast part, or it may be a geometrical concept, such as a bend, a hole, or a draft angle.
When you import a component from a CAD file, aP Pro identifies GCDs in that file using geometric analysis. You can also add GCDs to a component, such as welds for assemblies and gears for machined parts.
View GCDs
When you analyze an imported component, aP Pro assigns relevant creation operations needed to each GCD.
This information appears in the Geometric Cost Drivers pane, as an expandable tree of GCDs and GCD relations for the active component:
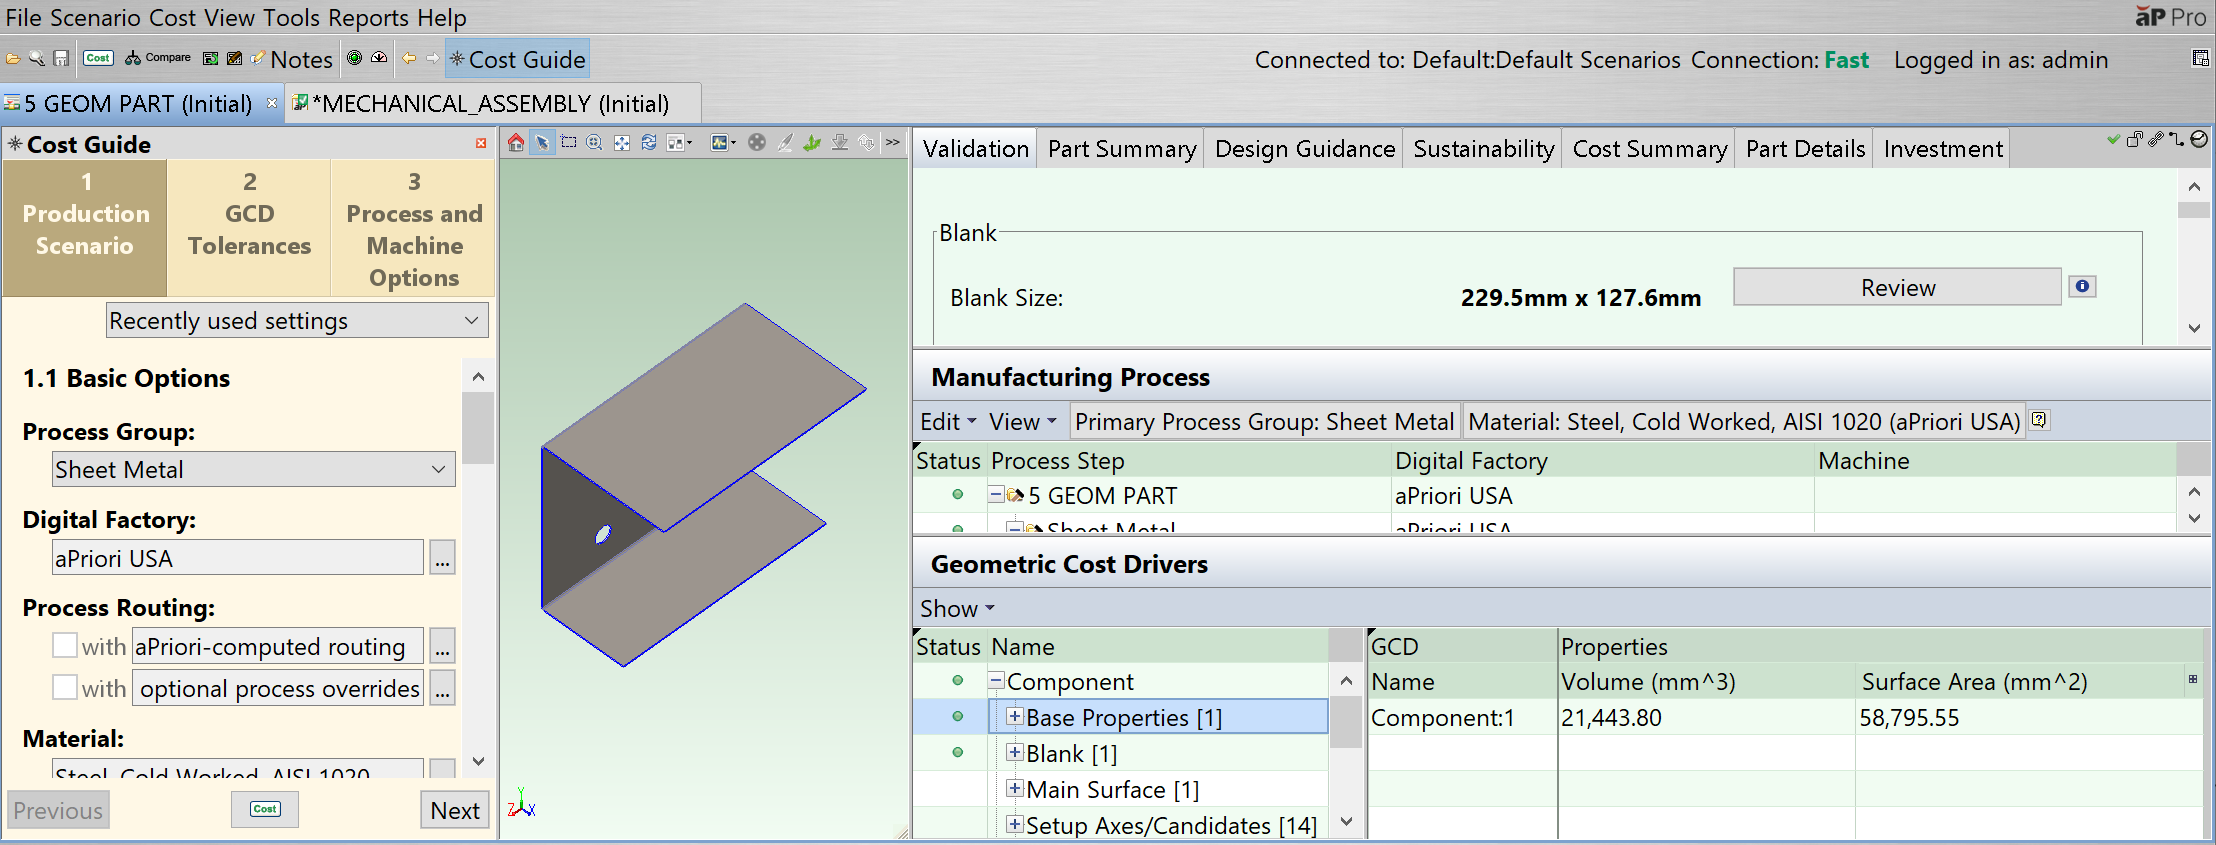
The top-level items are GCD types such as Component, Holes, or Surfaces.
-
Component GCDs provide the highest-level information for a component, such as overall dimensions, volume, or cross section.
-
Other GCD types describe features and to manufacturing approach, such as Holes or Bending/Forming. Each of these types corresponds to a specific manufacturing operation.
Types of GCD available depend on the Manufacturing Process Group selected for that component. See GCD Categories.
Select a GCD
Click on a GCD to select it:
 :
:
-
GCD properties are displayed in the table on the right. Fields with the
 icon are editable - see Edit a GCD.
 -
The selected GCD is highlighted in the Component Viewer. See Use the Component Viewer.
-
Manufacturing process steps related to this GCD are highlighted in the Manufacturing Process pane. See Review Manufacturing Process Information.
When you select a GCD relation, the related GCDs are highlighted in the Component Viewer. See GCD relations.
Edit a GCD
-
Double-click on an editable field.
-
Type a new value.
-
Press Enter.
-
In Auto-Costing mode, the component is now costed.
In One Click Costing mode, you must click the Cost button to cost the component. This mode enables you to make several GCD level edits and cost these changes in a single costing event.
Show Menu Options
In the GCDs pane:
-
Select Show > Relevant (the default) to display only relevant GCDs for a component.
-
Select Show > All to display all GCDs for a component.
GCD commands
Right-click on a GCD to see the commands available for that GCD:
-
Edit Operation: Opens the Geometric Cost Driver Editor for the highlighted GCDs. See Edit Operation Sequences.
-
Remove: Deletes the selected virtual weld.
-
Edit Tolerances: Opens the Tolerance Editor for the highlighted GCDs. You can also edit tolerance and roughness values directly in the GCD Properties table. See Manually Edit Tolerance Values.
-
Auto-Merge: Auto-merges an unmerged ComboVoid GCD. Available only for ComboVoid GCDs that have been unmerged using the Unmerge command below.
-
Unmerge: Unmerges a SimpleHole or a MultiStepHole GCD from a Void GCD in a ComboVoid GCD.
Note: For Stock Machining and Machining processes, advanced users can also alter setup axes. See the System-activated and User-activated Setup Axes section in the Cost Model Guide for more information.
GCD Status Indicators
Each GCD has status and user input indicators. The status indicator provides a red/yellow/green icon to indicate an error/warning/success status. The user input indicator provides a green user icon to indicate that you have made an explicit GCD edit (for example, operation or tolerance change).
The following icons are used in the GCD tree:
|
Icon |
Usage |
|---|---|
|
|
A GCD Type. The number in brackets indicates the number of GCDs of that type for the selected component. |
|
|
An Individual GCD. GCDs can be primary or nested. A primary GCD serves as a primary input to costing or analysis. A nested GCD belongs to a higher GCD level. Nested GCDs have less information and fewer options than primary GCDs. |
|
|
A GCD Relation Type. The number in brackets indicates the number of GCDs of that type for the selected component. |
|
|
A GCD Relation. |


Double-click a GCD Type or GCD Relation Type to see all GCDs/relations of that type in the GCD tree. Each row represents one GCD.
Assign the No Cost Feature operation to a GCD
The No Cost Feature operation enables you to specify that a GCD should not contribute to a part's cost. For more information, see No Cost Feature.
Working with large parts
Large parts might contain thousands of GCDs in a single category such as Curved Walls or Curved Surfaces. To avoid performance issues, aP Pro only auto-highlights and selects GCDs if the GCD Category node has fewer than 2,000 GCDs.
Your aPriori System Administrator can modify this setting - see the System Administration Guide for more details.